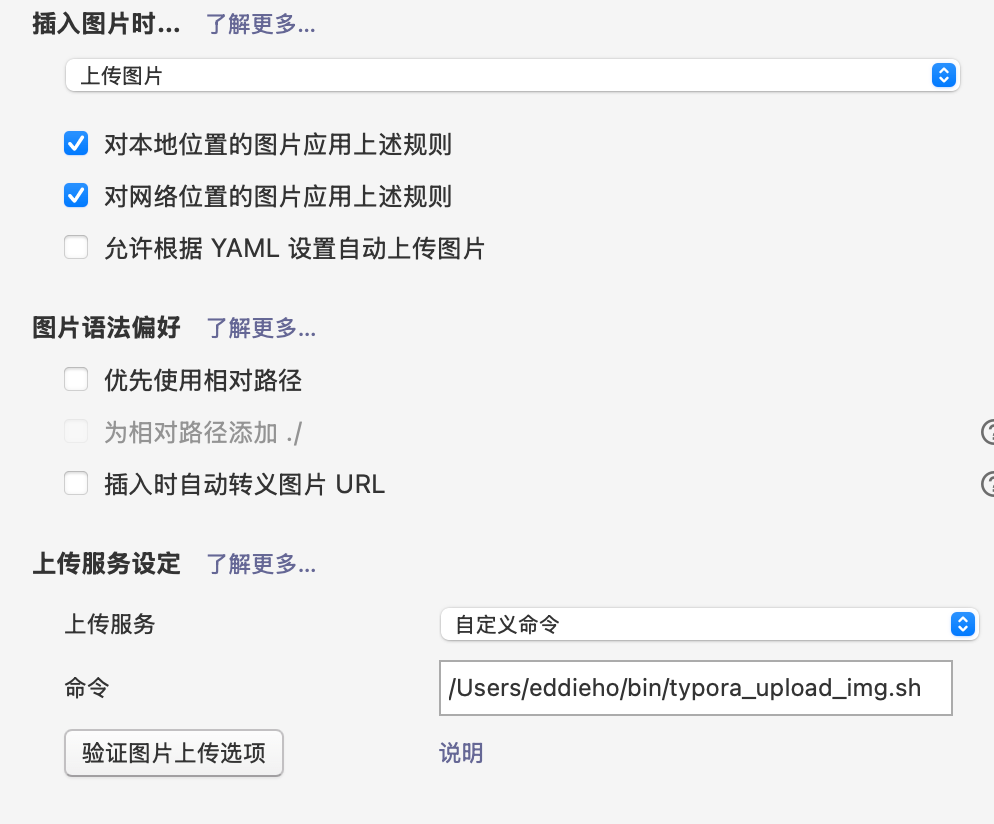
typora图片上传解决办法
背景
因为之前利用Oracle的免费服务器构建了一个图床服务,但由于每次写博客时复制粘贴完图片后都需要单独重新上传一遍图片再做图片链接替换整个过程相对较为繁琐且大大降低了博客编写的兴致。而且前几天在linuxdo 论坛上有刷到如何配置typora图片自动上传的一篇文章,今天想着研究一下如何实现这一功能。
步骤
首先是查看typora提供的帮助文档实现custom文件上传脚本的学习
Custom 定制
You could config a custom command to upload images, using tools that is not listed in above options, or even write your own tools / scripts. Typora will append all images that needs to be uploaded after the custom command you filled.
你可以配置一个自定义命令来上传图片,使用上述选项中没有列出的工具,甚至可以编写自己的工具/脚本。Typora 会在你填写的自定义命令后附加所有需要上传的图片。Then, Typora will fetch image urls from the last N lines of the standard output of your custom command. (N is the number of images to upload).
然后,Typora 将从您自定义命令的标准输出的最后 N 行中获取图片 URL。(N 为要上传的图片数量)。For example, if you write a tool upload-image.sh, then you can input [some path]/upload-image.sh in the command filed. Typora will call [some path]/upload-image.sh “image-path-1” “image-path-2” to upload two images located in image-path-1 and image-path-2. Then the command may return something like:
例如,如果你编写一个工具 upload-image.sh ,那么你可以在命令字段中输入 [some path]/upload-image.sh 。Typora 将调用 [some path]/upload-image.sh “image-path-1” “image-path-2” 上传位于 image-path-1 和 image-path-2 的两个图片。然后命令可能会返回类似以下的内容:Upload Success:
http://remote-image-1.png
http://remote-image-2.png
Then Typora will get the two remote image url from the output, and replace the original local images used in the Markdown document.
然后 Typora 将从输出中获取两个远程图片 URL,并替换 Markdown 文档中使用的原始本地图片。You could click the “Test Uploader” button to verify your custom commands.
你可以点击“测试上传器”按钮来验证你的自定义命令。Use current filename / filepath in custom commands
使用当前文件名/文件路径在自定义命令中You can use ${filename} and ${filepath} in your custom commands, they will be replace as the current markdown file name and current file path. For “untitled” files that have not been saved on your disk, they will be empty strings.
您可以在自定义命令中使用 ${filename} 和 ${filepath} ,它们将被替换为当前 Markdown 文件名和当前文件路径。对于尚未在您的磁盘上保存的“未命名”文件,它们将是空字符串。图传上传命令实现主要是通过
postcurl -X POST \ -H "Authorization: Bearer {token}" \ -F "/Users/eddieho/Downloads/image.png" \ https://hexo.kygoho.win/upload/根据上述内容实现汇总进行脚本编写
#!/bin/bash

# 替换成你的实际 token
TOKEN="your_actual_token"
# 替换成你的实际上传 API 地址
API_URL="https://hexo.kygoho.win/upload/"

# 获取要上传的图片数量
IMAGE_COUNT=$#

# 存储上传后的图片 URL
UPLOADED_URLS=()

# 循环处理每个图片路径
for ((i=1; i<=IMAGE_COUNT; i++)); do
  IMAGE_PATH=$1
  shift

  # 使用 curl 上传图片
  RESPONSE=$(curl -s -X POST \
    -H "Authorization: Bearer ${TOKEN}" \
    -F "image=@${IMAGE_PATH}" \
    "${API_URL}")

  # 使用 jq 提取 JSON 中的 url 字段
  UPLOADED_URL=$(echo "$RESPONSE" | jq -r '.url')

  # 检查 URL 是否为空,如果为空,则输出错误信息并退出
  if [ -z "$UPLOADED_URL" ]; then
    echo "Error: Upload failed for ${IMAGE_PATH}"
    echo "$RESPONSE"
    exit 1
  fi

  # 将上传后的 URL 添加到数组中
  UPLOADED_URLS+=("$UPLOADED_URL")

done

# 输出 Upload Success:
echo "Upload Success:"

# 循环输出上传后的 URL
for URL in "${UPLOADED_URLS[@]}"; do
  echo "$URL"
done

exit 0
总结
通过这个脚本实现typora图片上传的自动配置
